I’m a Pro Photographer. Here Are My Favorite iPhone Camera Tips
Your iPhone is more capable than you probably think. Modern smartphone cameras pack serious hardware and clever software that can produce stunning results — but only if you know how to push them.
I’ve been shooting professionally for years, and I regularly bring my iPhone to professional shoots. The iPhone 17 Pro in particular has impressed me enough that I reach for it constantly. But honestly, most of these tips work just as well on older iPhones and recent Android phones too.
Here are six ways to seriously level up your iPhone photography.
Switch Lenses With Purpose
Most people tap between wide, ultrawide, and telephoto without really thinking about why. That’s leaving a lot on the table.
Take a moment before you shoot. Ask yourself what the most important element in the scene actually is. A telephoto zoom is brilliant for isolating a single subject — a statue, a building detail, a person’s face — by cutting out all the visual clutter around it. You might need to step back a bit first, but the cleaner composition is absolutely worth it.
On the other hand, sometimes surrounding context tells the whole story. In that case, stick with the standard lens or go even wider. Just make sure your main subject doesn’t get swallowed by everything else in the frame. Moving physically closer and finding interesting foreground details — a patch of wildflowers, a textured wall — can anchor the shot beautifully.
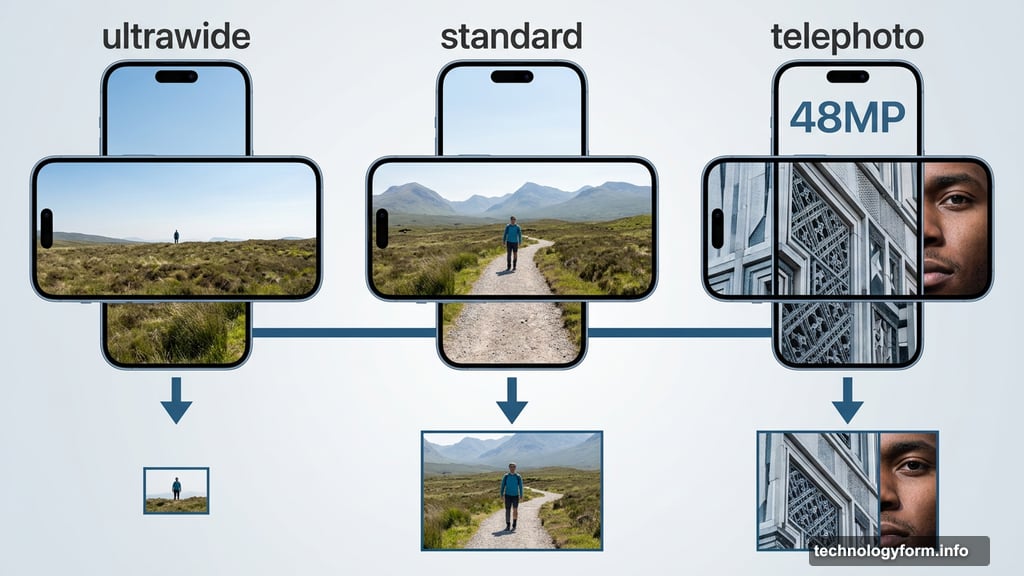
The iPhone 17 Pro’s new 48-megapixel telephoto lens is genuinely excellent for this kind of selective framing. So is the Samsung Galaxy S25 Ultra and the Pixel 10 Pro, if you’re in the Android camp.
Nail Your Composition First
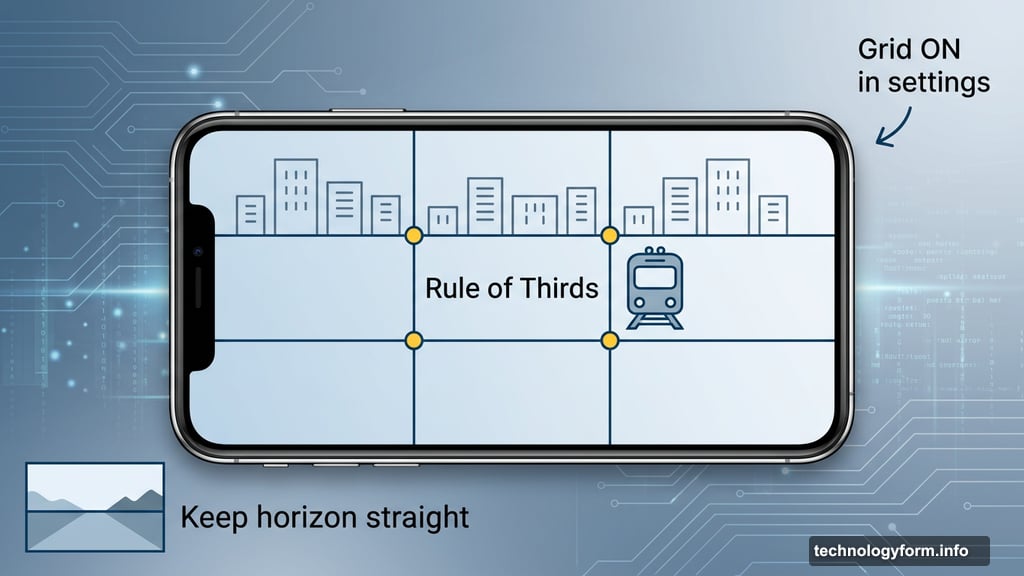
![A well-composed iPhone photo demonstrating the rule of thirds with a train crossing the right vertical grid line and buildings along the top horizontal line]
No editing app in the world fixes a badly composed photo. Composition is the foundation everything else builds on.
Start with the basics. Keep horizons straight. Don’t slice the top of someone’s head off in a portrait. Simple stuff, but surprisingly easy to forget in the moment.
Then try the rule of thirds. Imagine a tic-tac-toe grid over your screen. Place your main subject where those grid lines intersect rather than dead center. It sounds like a small thing, but it creates a natural visual tension that makes images far more satisfying to look at. I shoot with this grid permanently switched on in my camera settings — I’d strongly suggest you do the same.
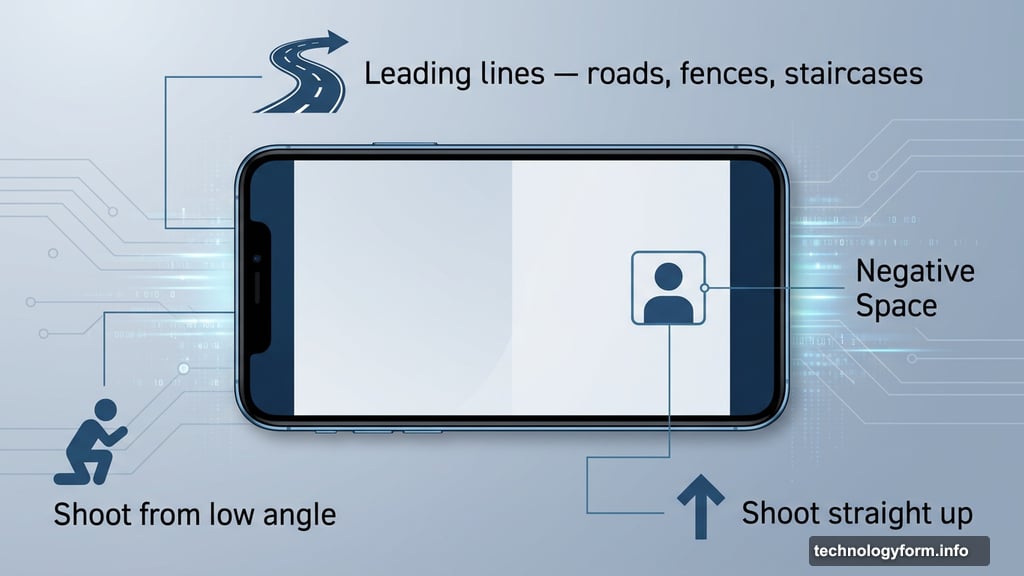
Beyond that, look for leading lines. Roads, fences, staircases, rivers — anything that naturally draws the eye deeper into the frame. Also experiment with negative space. Placing your subject way off to one side, surrounded by emptiness, can create a powerful sense of isolation or scale. Don’t be afraid to hold your phone at weird angles. Sometimes the most interesting shot comes from crouching down or shooting straight up.
Come Back at Different Times of Day
The best photographers aren’t just skilled — they’re patient. And a big part of that patience is returning to the same spot under different conditions.
Golden hour, that window just after sunrise and just before sunset, is famous for good reason. The sun sits low on the horizon, casting long warm shadows and painting the sky in colors that mid-day simply can’t match. Some spots look incredible at sunrise but ordinary at sunset, depending on which direction the light comes from. A little research beforehand goes a long way.
Mid-day light gets a bad reputation, but it creates strong contrast and hard shadows that work brilliantly for urban street photography. And overcast or rainy days? Don’t write those off either. Moody skies and rain-slicked streets that mirror city lights can produce atmospheric shots that sunny days never could.
The iPhone 17 Pro is IP68 water resistant, so rain genuinely isn’t a reason to put your phone away.
Shoot After Dark
![iPhone night mode photo of a city street scene with vibrant shop windows and reflections on wet pavement captured sharp and colorful]

Night is not the enemy of good photography. Not anymore.
The iPhone 17 Pro’s Night mode is one of the best on any phone right now. It handles city scenes especially well — car headlights streaking through the frame, illuminated shop windows, festive lights strung between buildings. All of that becomes incredible material once the sun goes down.
And if it’s raining? Even better. Wet streets reflect all those light sources back at you, doubling the visual interest. Pair that with Night mode and you have genuinely compelling shots that most people wouldn’t think to attempt.
Take Control of Your Exposure
Auto mode is smart. But “smart” doesn’t always mean “dramatic.”
Your iPhone tries to balance every shot so shadows aren’t too dark and highlights aren’t too bright. That’s sensible, but it often flattens the mood out of a scene. Some of my favorite images come from deliberately underexposing the shot — letting the shadows go deep and dark while a single highlight picks out the subject.
To do this yourself, just tap anywhere on your screen to focus. A small sun icon appears next to the focus box. Slide it downward to darken the frame. That’s it. You now have a moody, low-key image that can look stunning in black and white.
Remember: you’re the photographer. The camera is just a tool. Don’t let it make all the creative decisions for you.
Edit Like You Mean It
Straight-out-of-camera shots are a starting point, not a finished product. At least, that’s how I see it.
I do most of my serious editing in Adobe Lightroom, which gives precise control over exposure, color, shadows, and tone. For iPhone-first editing, I love Darkroom — it has a great range of filmic styles and feels intuitive on a small screen. If you’re just getting started, Google’s Snapseed is completely free and surprisingly powerful for a beginner app.
My personal approach is fairly restrained. I’ll tweak exposure, pull back on highlights, maybe shift the colors toward something warmer or cooler depending on the mood I’m after. Sometimes I’ll go for a contrasty black and white treatment. Other times I’ll try a vintage film look just to see how it feels.
If you’re shooting for serious editing purposes, turn on Apple’s ProRaw format. It captures far more data than a standard JPEG, which gives you much more flexibility later — especially when adjusting shadows or white balance without the image falling apart.
Here’s the important thing: none of this destroys your original file. You can experiment as wildly as you like and simply revert if you hate the result. So make a cup of tea, find a comfortable spot, and just play. You might be amazed what you can pull out of shots you’d already given up on.
There really is no right or wrong way to edit a photo. The only question that matters is whether you like what you’ve created.